Injection Basics and Site Safety
Proper injection technique, equipment selection, site rotation, and how to recognise and respond to infection or serious complications.
- Select appropriate needle gauges and syringe sizes for drawing and injecting
- Identify the major injection sites and their anatomical landmarks, pros, and cons
- Perform injections using correct technique including aseptic preparation
- Understand PIP causes and practical management strategies
- Recognise the signs of injection-site infection and know when to seek medical care
Why Technique Is a Safety Issue, Not Just a Preference
Injection technique is where abstract pharmacological risk meets concrete physical harm. The literature on complications from amateur intramuscular injections is sobering: injection-site abscesses, nerve damage, arterial injection, oil embolism, and life-threatening necrotising fasciitis have all been documented in non-medical injection settings. Most of these are preventable. The barrier to preventing them is not difficulty, proper technique is teachable and learnable, it is the casual attitude that treats pinning as a minor logistical detail rather than a medical procedure requiring respect for sterile technique and anatomical knowledge.
This lesson will not make you immune to complication. It will give you the framework for minimising risk to the extent possible without clinical supervision, and, critically, the ability to recognise when something has gone wrong before it becomes a serious medical event.
Equipment: Needles, Syringes, and What to Use When
Syringes
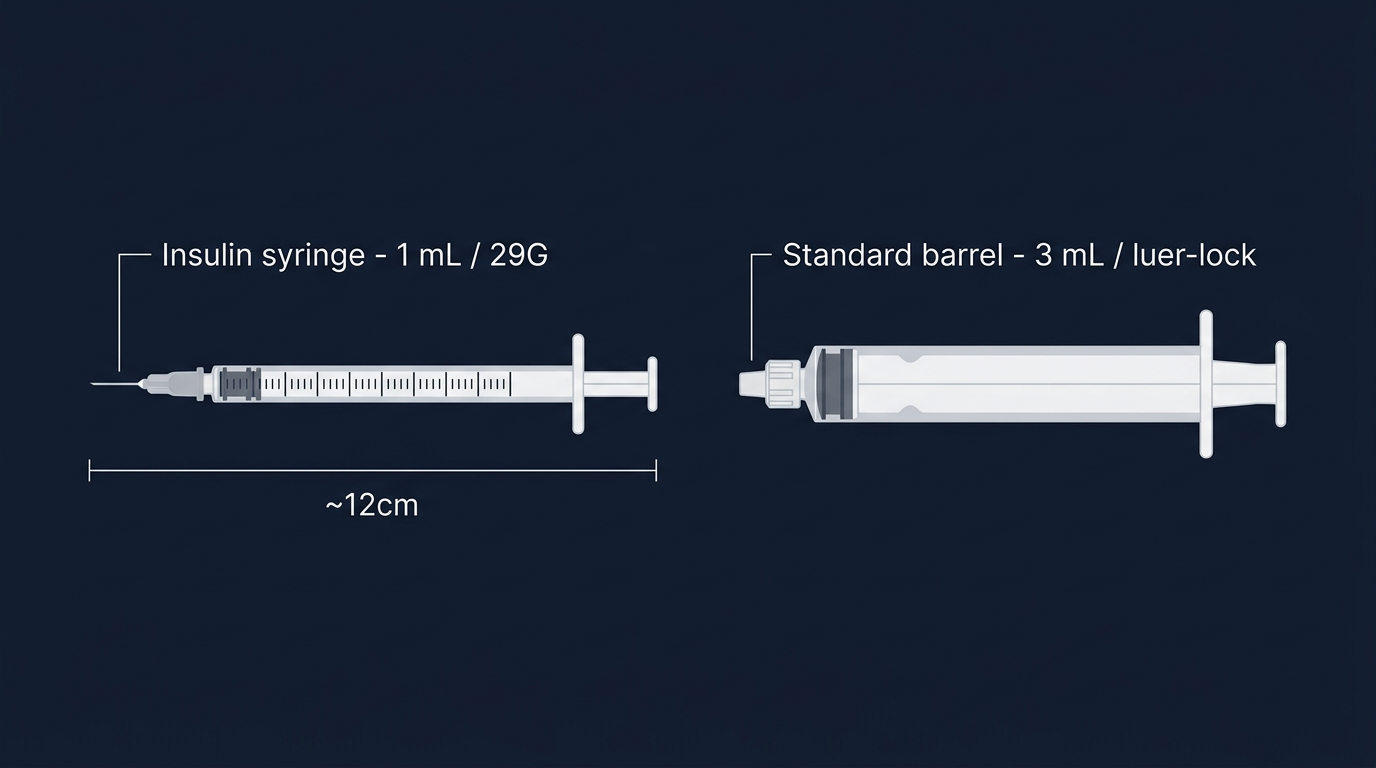
Syringes are typically described by volume. The most common sizes for injectable androgen use are 1 mL, 2 mL, and 3 mL (also called 1 cc, 2 cc, 3 cc). For most intramuscular injections of 1–2 mL, a 2 mL or 3 mL syringe is appropriate. For subcutaneous injections of smaller volumes (0.5–1 mL), a 1 mL syringe provides better control over precise volumes.
Syringe barrels are calibrated in mL or fractional units; always double-check the markings to ensure you are reading the correct volume. A common error is reading a 0.5 mL line on a 3 mL syringe as 0.5 mL when the barrel is calibrated in 0.2 mL increments, take a moment to count the graduation marks on any new syringe.
Needle Gauges and Lengths: Drawing vs. Injecting

Needle gauge is described by a number, where a higher gauge = thinner needle. A 21-gauge needle (21G) is larger in diameter than a 25G needle. The selection of gauge and length depends on whether you are drawing from the vial or injecting into tissue, and which site you are using.
Drawing needles are typically 18G or 20G, wide enough to aspirate viscous oil efficiently without creating excessive vacuum on the vial. A 1.5" length is standard for drawing. Using a blunt drawing tip (a blunt pin/filter needle) is ideal to avoid micro-coring the vial rubber stopper, which can push rubber fragments into the solution.
Injection needles should be swapped after drawing, the act of pushing through a rubber stopper dulls the tip slightly, increasing PIP and tissue damage. For intramuscular injection:
- Glute (ventrogluteal or dorsogluteal): 23G–25G, 1"–1.5" length. Deeper muscle in individuals with higher subcutaneous fat may require 1.5".
- Vastus lateralis (lateral quad): 23G–25G, 1". Typically less subcutaneous fat over this muscle in training individuals.
- Deltoid: 25G, 1". A smaller, shallower muscle, shorter needles are appropriate.
- Latissimus dorsi (lats): 25G–27G, 1". A technically accessible but anatomically unforgiving site, for experienced injectors.
For subcutaneous injection (less common, but used by some for smaller volume, shorter ester preparations): 27G–29G, 5/8" or 1/2" needle, injecting into the pinched abdominal or upper gluteal subcutaneous fat layer. Subcutaneous injections produce slower absorption than intramuscular but can reduce PIP for certain preparations.
Thinner gauges (25G–27G) inject more slowly (more pressure required to push oil through a narrow bore) but cause less tissue trauma. Many experienced injectors consider the trade-off worthwhile for commonly used sites, particularly delts and lats where minimising trauma supports ongoing rotation.
Sites: Anatomy, Pros, Cons, and Landmarks
Interactive tool: Use the 3D Injection Site Map to explore all these landmarks on a rotatable body model before reading the text descriptions below.
Ventrogluteal (VG): The Gold Standard
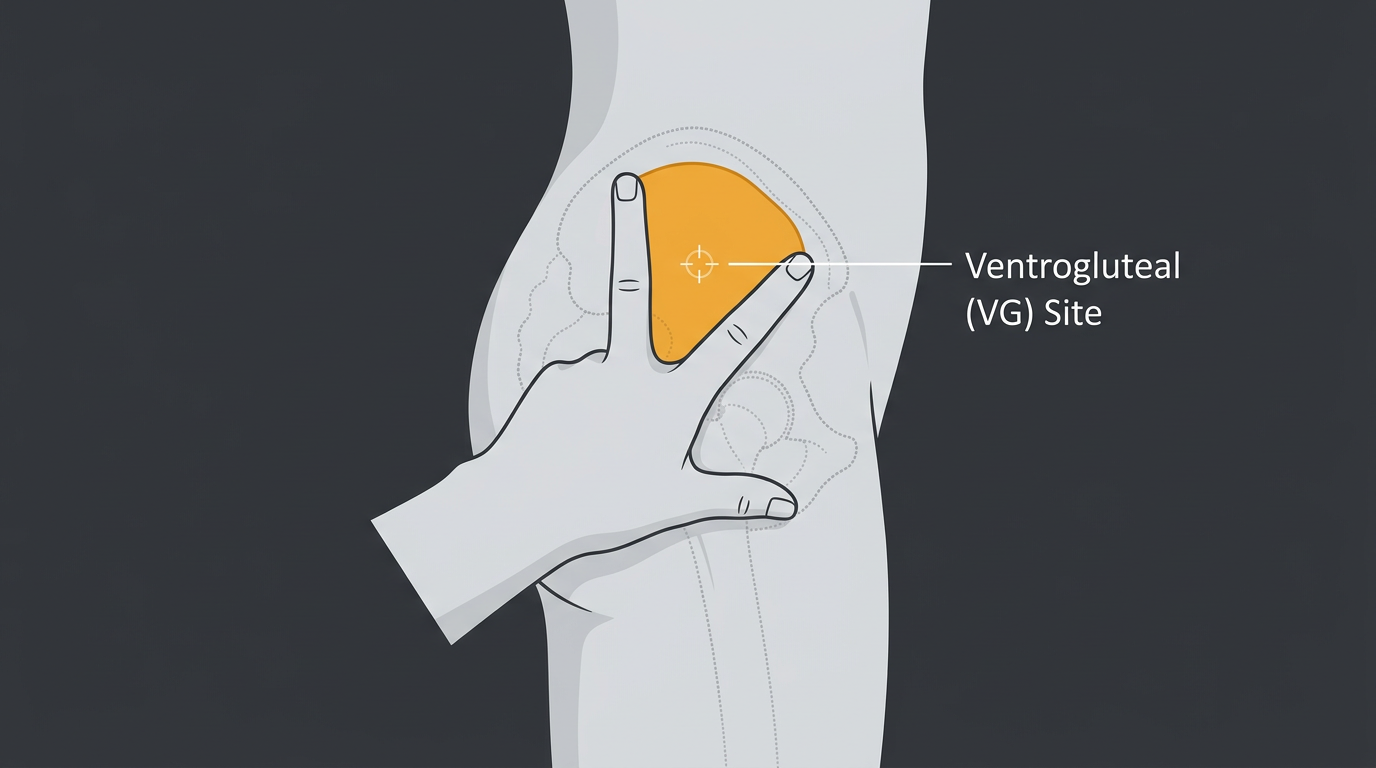
The ventrogluteal site, the gluteus medius muscle, accessed from the side of the hip, is widely considered the safest intramuscular injection site for self-administered or assisted injections. The muscle is deep, well-muscled in almost all body types, free from major nerves and blood vessels, and easily accessible in a standing or lying position.
Landmark: Place the heel of your hand on the greater trochanter (the bony prominence on the lateral hip). Extend your index finger toward the anterior superior iliac spine (front hip bone crest). Splay your middle finger back toward the posterior iliac crest. The triangle formed between your two fingers and the heel of your hand marks the injection zone. Inject in the centre of this triangle, angled slightly toward the hip joint (15–20° from perpendicular).
Pros: Large muscle mass, no major nerves or vessels, no risk of sciatic nerve damage, accessible in most positions, good for 1–2 mL volumes.
Cons: Requires some flexibility or partner assistance for optimal positioning. Can feel awkward for new injectors.
Dorsogluteal (DG): Common But Riskier
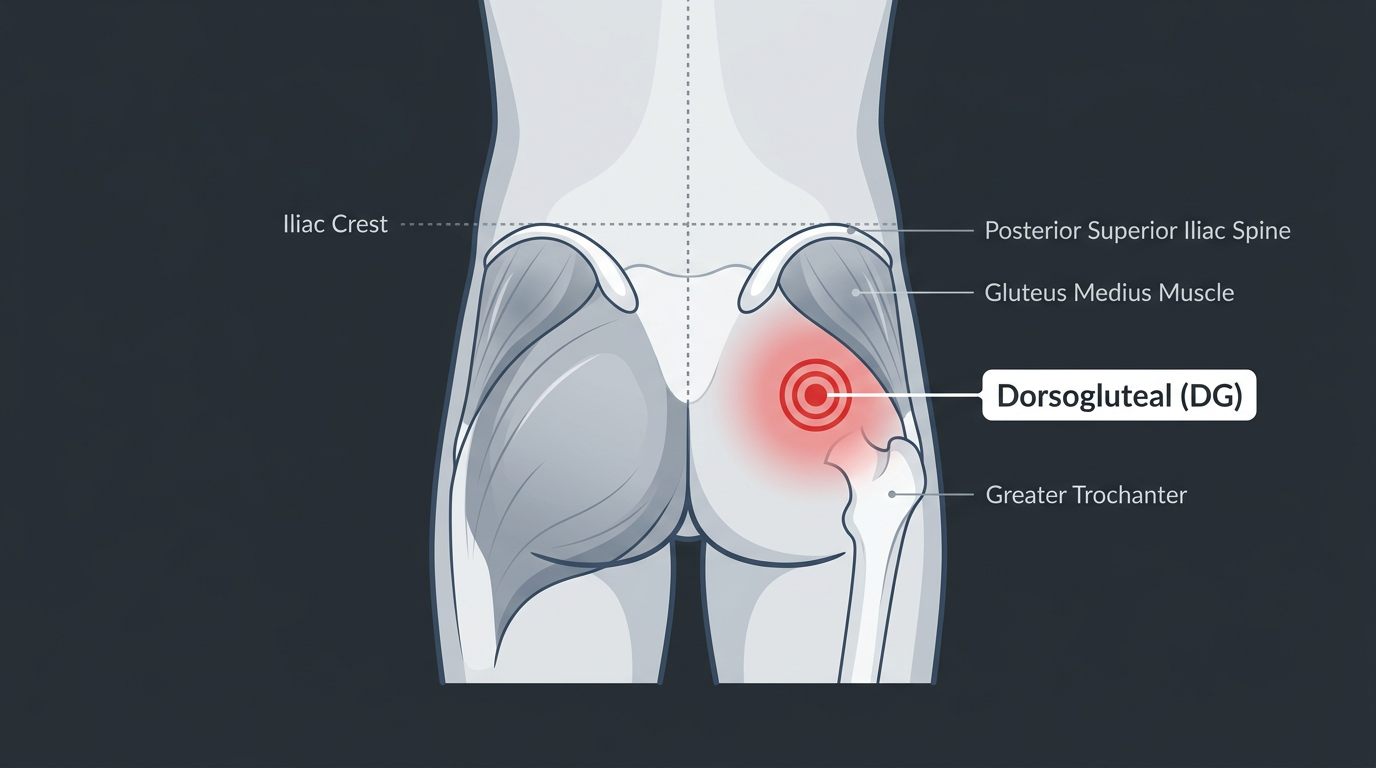
The dorsogluteal site accesses the gluteus maximus muscle in the upper outer quadrant of the buttock. It has historically been the most commonly taught injection site in clinical settings, but it is actually more hazardous than VG because of its proximity to the sciatic nerve and the superior gluteal artery. Misplaced injections have caused sciatic nerve injury, a potentially disabling complication.
Landmark: Mentally divide the buttock into four quadrants. Inject in the upper outer quadrant, as far lateral and superior as possible within that zone. Never inject in the lower or inner quadrants.
Pros: Large muscle, familiar to most people, easy positioning (lying prone).
Cons: Proximity to sciatic nerve. More difficult to accurately locate landmarks in individuals with substantial gluteal adiposity.
Vastus Lateralis (Lateral Quad)
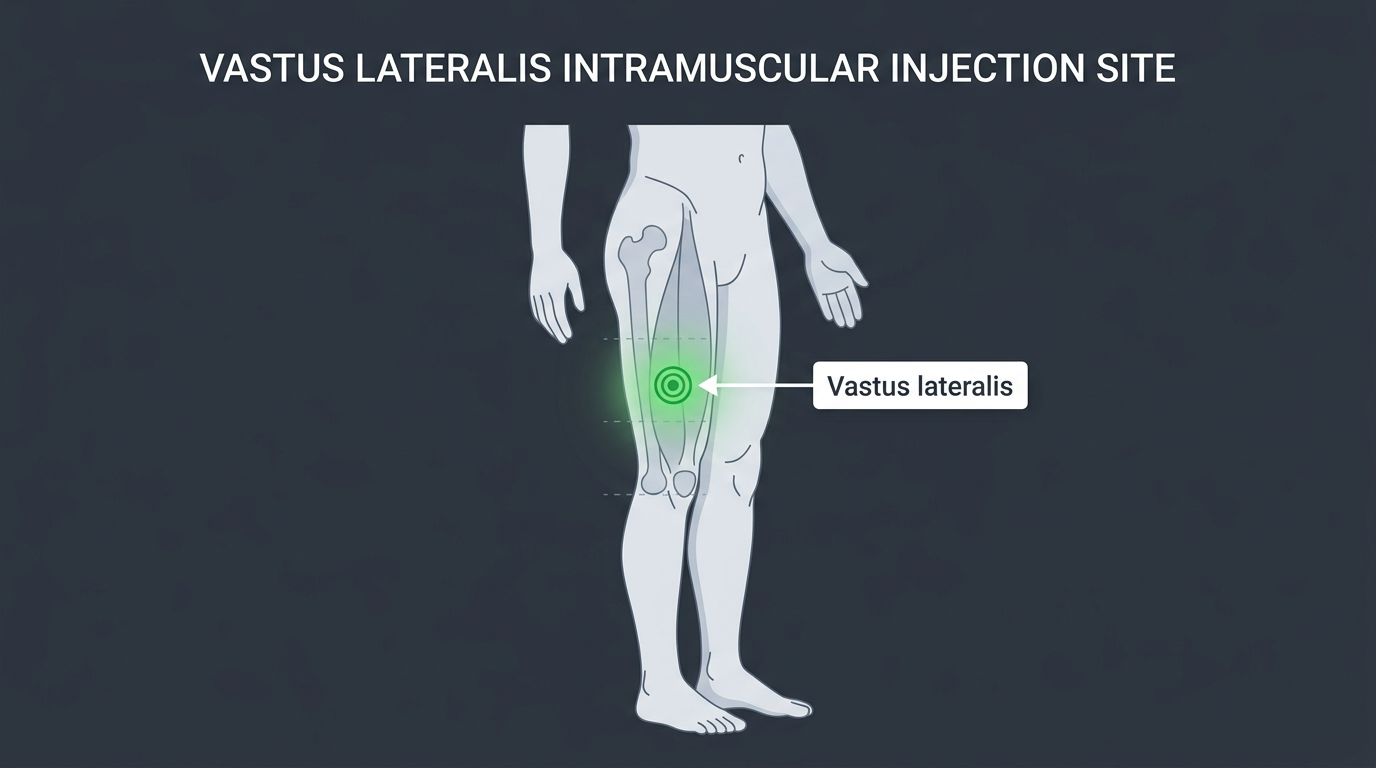
The vastus lateralis is the outer head of the quadriceps, running along the lateral aspect of the thigh. It is an excellent site for self-injection, easily visualised, relatively avascular in the mid-portion, and accessible sitting down.
Landmark: Target the middle third of the outer thigh (between knee and hip), on the lateral surface. A span of approximately 4 fingers above the kneecap and 4 fingers below the hip crease defines the safe zone. Inject into the belly of the muscle, directed slightly toward the femur at a perpendicular angle to the skin surface.
Pros: Easily visualised and self-accessible. No major nerve or vessel hazard in the correct zone. Good rotation when VG is overused.
Cons: Quad injections can cause pronounced PIP and transient soreness that impairs training, particularly with high-concentration or high-solvent solutions. Leaner individuals may have limited muscle depth. Higher risk of subcutaneous deposition in individuals with low muscle mass or high adiposity at this site.
Deltoid
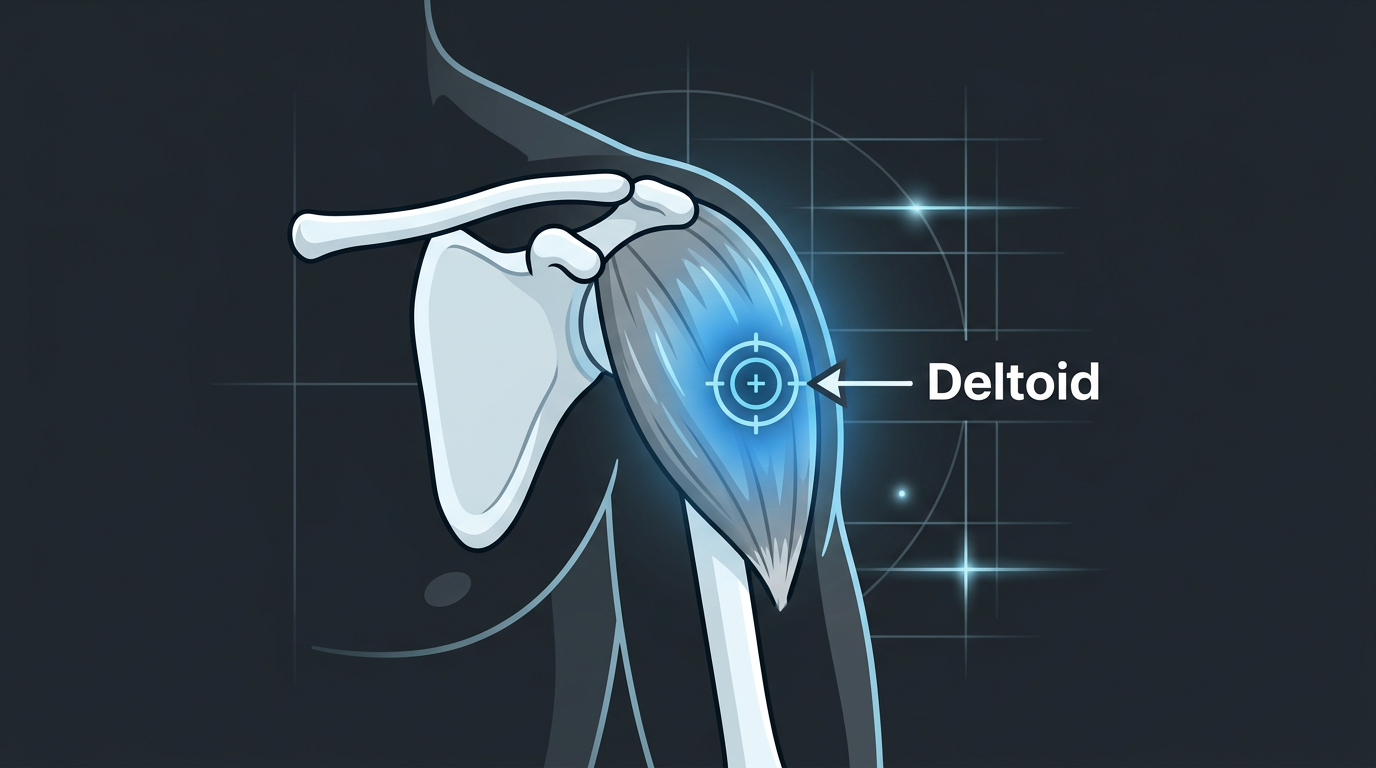
The deltoid (shoulder muscle) is a smaller intramuscular site, suitable for volumes of 1 mL or less. It is a convenient location for a quick self-injection and is commonly used for low-volume compounds.
Landmark: Palpate the acromion process (the bony point at the top of the shoulder). Move 2–3 finger widths directly below the acromion, this places you in the middle deltoid muscle belly. Inject perpendicular to the skin, using a short (1") needle.
Pros: Easy self-access, no lying down required, quick injection.
Cons: Small muscle volume limits injectable volume, do not exceed 1 mL routinely. More PIP per mL than larger sites. Proximity to the brachial plexus and axillary nerve at the inferior margin, stay in the upper half of the muscle.
Lats (Latissimus Dorsi)

The lats are a large, accessible muscle used by experienced injectors as a rotation option. Injection is typically performed mid-belly, at the lateral border of the lat, with the arm elevated.
Landmark: With the arm slightly elevated, identify the lateral edge of the lat muscle. The injection zone is the belly of the muscle, avoiding the axillary region superiorly. This site requires more anatomical confidence than others and is not recommended for beginners.
Technique: Preparing and Executing the Injection
Sterile Preparation
This step receives inadequate emphasis in most informal injection education. Infection is a serious risk that ranges from superficial abscess (painful but manageable) to life-threatening septic joint or necrotising fasciitis (medical emergencies). Sterile technique is the primary defence.
- Wash hands thoroughly with soap and water before handling any equipment.
- Assemble equipment on a clean surface. Ideal: a fresh paper towel or clean surface. Never place needles or syringes directly on unclean surfaces.
- Wipe the vial top with an alcohol swab. New vials from reputable sources are typically sterile, but wiping the rubber stopper is standard practice before every draw.
- Draw the oil. Using your drawing needle, draw slightly more than the target volume to allow for air bubble expulsion. Invert the vial, insert the needle below the oil surface, and draw.
- Expel air and switch to injection needle. Gently tap and flick the syringe to collect air bubbles, push the plunger to expel them, then cap and swap to the injection needle.
- Wipe the injection site with alcohol swab. Allow it to dry fully before injecting, wet alcohol on the needle track is irritating to tissue.
The Injection
- Relax the target muscle completely. Tensed muscle causes more pain and increases the risk of PIP. For glute injections, stand on the opposite leg and let the injection-side hip drop slightly (shifting weight off the muscle). For quad injections, sit with the leg relaxed.
- Insert the needle with a smooth, confident motion. Hesitant, slow insertions cause more pain than quick, decisive ones. Insert at the appropriate angle (perpendicular for intramuscular sites; 45° for subcutaneous).
- Aspiration, the debate. Traditional nursing education taught aspiration (pulling back the plunger before injecting to check for blood, indicating accidental vascular puncture). Major medical bodies, including the CDC and WHO, have moved away from recommending aspiration for intramuscular injections at standard sites, citing the absence of evidence that it prevents complications and evidence that it increases discomfort and tissue trauma. The anatomical reality is that the risk of hitting a major vessel in the VG or lateral quad is low when landmarks are correctly identified. Many experienced users aspirate anyway as a personal safety check; others do not. If you aspirate and get a blood flash (blood drawn into the syringe), withdraw without injecting and apply pressure. This is rare but possible.
- Inject slowly. Push the plunger steadily over 15–30 seconds for a 1–2 mL injection. Rapid injection increases pressure in the tissue and substantially worsens PIP.
- Withdraw and apply pressure. Remove the needle along the same angle of insertion, apply gentle pressure with a clean swab or cotton ball, and massage the site lightly to help disperse the oil.
PIP: Causes and Management
PIP, post-injection pain, ranges from mild, transient soreness (normal) to severe, incapacitating inflammation that persists for days (abnormal and indicative of a problem). Understanding its causes allows most cases to be prevented.
High concentration solutions. Solutions above 200 mg/mL often use more benzyl benzoate (BB) as solvent, which is irritating to tissue. UGL (underground lab) preparations sometimes push concentrations to 300–400 mg/mL to reduce injection volume, at the cost of dramatically increased PIP.
High benzyl alcohol (BA) percentage. BA is a bacteriostatic preservative standard in injectable preparations, but higher percentages are more irritating. Standard concentrations are 1–2%; above that, PIP increases.
Short-chain esters. Propionate and Acetate esters are inherently more irritating than longer-chain esters, independent of concentration or solvents. This is partly a property of the ester itself and partly that faster-acting compounds often produce a rapid local tissue response.
Cold oil. Injecting cold oil (vials stored in a cool environment) dramatically increases PIP. Warm the vial in your hand, run warm water over it, or place it briefly in a cup of warm (not hot) water before drawing. Warm oil flows more easily, disperses better, and causes less local reaction.
Technique-related factors. Injecting too quickly, depositing oil too superficially (subcutaneous deposition during an intended intramuscular injection), using a dull needle, and hitting scar tissue from overused sites all worsen PIP.
Management: For mild PIP, heat application (heating pad, warm shower) increases local blood flow and speeds oil dispersal. Light movement of the muscle (walking, light training) also helps. Non-steroidal anti-inflammatory drugs (NSAIDs) like ibuprofen can reduce inflammation in acute cases. Severe PIP unresponsive to these measures, or PIP accompanied by fever, spreading redness, or discharge, should be evaluated medically.
Recognising and Responding to Infection
Infection is the most serious practical risk of injection. It presents differently from PIP and the distinction is critical:
| Feature | PIP | Infection |
|---|---|---|
| Onset | Peaks 12–48 hours post-injection | Typically develops 3–7+ days post-injection |
| Pain character | Diffuse aching, often improves with warmth | Localised, throbbing, worsening over time |
| Skin changes | Mild redness, may be warm | Significant redness, warmth, spreading redness, skin changes |
| Swelling | Mild to moderate | Significant, firm or fluctuant |
| Systemic signs | None | Fever, chills, malaise (signs of systemic infection) |
| Discharge | None | Pus, discharge from the wound |
Any injection-site complication with fever, spreading erythema (red streaking away from the injection site, a sign of spreading cellulitis), significant fluctuant swelling (suggesting abscess), or signs of systemic illness warrants immediate medical evaluation. Do not attempt to self-manage an abscess by applying heat and waiting. Do not minimise symptoms because you are worried about explaining your compound use to a physician, your life is worth more than that conversation.
Septic myositis, necrotising fasciitis, and bacteraemia from injection-site infections are documented, treatable, and sometimes fatal if not caught early. Emergency physicians see these presentations regularly and are there to save you, not judge you.
Sterile technique, single-use needles, and properly sourced sterile solutions are the preventive measures that make infection a rare rather than common complication of responsible injection practice. Cut no corners on these, the consequences are not worth it.
Selected references for major clinical, mechanistic, or protocol claims. Community-practice points may not be cited individually.